
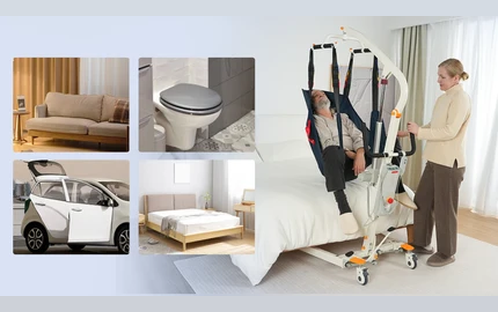
Learning how to use patient lift equipment correctly can make transfers safer and less physically demanding for both the person being moved and the caregiver. However, safe operation depends on more than pressing an up or down button. You must choose the correct lift and sling, inspect every component, position the person properly, and follow the instructions for the specific model.
This guide explains the general process for using a patient lift at home. It does not replace hands-on training, an individualized care plan, or the manufacturer’s operating manual.
Choose the Right Type of Patient Lift
To use a patient lift safely, start by matching the equipment to the person’s weight, mobility, trunk control, and ability to follow instructions. Then inspect the lift and sling, position the sling correctly, perform a low trial lift, move slowly, and lower the person completely before disconnecting the sling.
Different patient lifts are designed for different levels of mobility. A person who cannot safely bear weight usually needs a full-body sling lift, while someone who can participate in standing may be better suited to a sit-to-stand device.
|
Lift type |
Best suited for |
User participation |
Typical uses |
Main limitation |
|
Full-body sling lift |
People who cannot safely bear weight |
Minimal |
Bed, wheelchair, commode, and some floor transfers |
Requires careful sling selection and positioning |
|
Sit-to-stand lift |
People with partial leg strength and trunk control |
Active participation |
Chair, bedside, and toilet transfers |
Not suitable for fully dependent users |
|
Ceiling lift |
Frequent transfers in an adapted room |
Depends on the sling and user |
Bed and room transfers |
Requires permanent installation |
Full-Body Sling Lifts
A full-body patient lift supports the person in a fabric sling while the lift raises their entire body. It is generally intended for people who cannot stand, pivot, or support enough weight through their legs to complete a transfer safely.
The sling must support the appropriate parts of the body. Someone with poor head or trunk control may need more support than a person who can remain upright independently. Never assume that any full-body sling will work with any lift; its size, attachment style, and weight rating must all be compatible with the equipment.
Sit-to-Stand Lifts
A sit-to-stand lift is intended for a person who can bear at least some weight through the legs, maintain sufficient trunk control, and follow basic instructions. Depending on the design, the person may need to grip a support bar, keep their feet positioned correctly, or lean forward during the transition.
The VOCIC AY03 PRO Sit-to-Stand Lift Assist is one example for weight-bearing users. Its 400-pound capacity, multi-point padded support, dual-lock braking system, compact base, and split-seat design are intended to support short transfers between seated surfaces. These features do not make it suitable for someone who cannot participate in standing or maintain the posture required by the device.
Once the appropriate type of lift has been selected, complete a full safety check before attaching or raising the person.
Complete a Safety Check Before Every Transfer
A pre-transfer inspection may feel repetitive, but it can reveal a damaged sling, low battery, obstructed route, or incompatible component before the person is suspended.

Confirm the Lift and Sling Weight Limits
Check the rated capacity of the lift and the sling separately. The safe limit is determined by the lowest-rated component in the system. A lift rated for 440 pounds is not safe for that load if its sling or attachment hardware has a lower limit.
Sling size matters as well. A sling that is too large may allow the person to slide, while one that is too small may create pressure, discomfort, or inadequate support. A detailed patient lift sling guide can help caregivers understand the differences among full-body, divided-leg, sit-to-stand, hygiene, and repositioning slings.
Inspect the Equipment
Before every use, inspect:
- The sling for tears, fraying, stretched loops, open seams, or damaged fasteners
- The hooks and spreader bar for bending, looseness, or sharp edges
- The frame, boom, base, and casters for visible damage
- The battery level or hydraulic system
- The hand control, emergency stop, and emergency-lowering mechanism
Do not use the lift if it leaks fluid, makes an unusual noise, moves unpredictably, or has a damaged load-bearing component. Label or separate faulty equipment so that another caregiver does not use it accidentally.
Prepare the Route and Destination
Remove rugs, cords, furniture, and other obstacles between the starting point and the destination. Position the wheelchair, commode, or bed before lifting the person. Move wheelchair footrests aside when appropriate and make sure there is enough space for the lift’s base.
Wheel-lock instructions differ among models and transfer stages. Some lifts are designed to remain mobile while the person is raised so the base can settle beneath the load, while others have different requirements. Follow the manual and the training provided for the exact model instead of applying one universal brake rule.
Explain the Transfer
Tell the person what will happen before you begin and continue communicating throughout the transfer. Ask about pain, dizziness, fear, skin sensitivity, and the position of any tubes or medical devices.
Whether one or two caregivers are required depends on the lift, the individual’s condition, the care plan, and applicable workplace rules. Electric operation alone does not automatically make every transfer safe for one caregiver.
After these checks, the sling must be positioned without wrinkles, uneven straps, or unsupported body areas.
Position the Patient Lift Sling Correctly
The correct sling position depends on whether the person is lying in bed or sitting in a chair. It also depends on the sling’s design. Always use the placement and attachment method shown in that sling’s instructions.
Placing a Sling Under a Person in Bed
If the care plan permits rolling, help the person turn onto one side. Fold or roll part of the sling and place it along the back, aligning it as directed by the manufacturer. Help the person roll in the opposite direction, then unfold the remaining material.
Smooth the sling so that there are no thick folds beneath the back, hips, or thighs. Wrinkles can create concentrated pressure and become painful once the sling carries the person’s weight.
Position the head support and leg straps according to the sling design. Do not improvise by crossing straps or changing loop positions unless the instructions specifically permit it.
Placing a Sling From a Wheelchair or Chair
First confirm that the sling can be applied while the person is seated. Lean or reposition the person only as allowed by the care plan, then guide the sling down behind the back until its lower edge reaches the intended position.
Bring each leg section under the corresponding thigh without pulling aggressively against the skin. Make sure clothing, catheter tubing, and other medical lines are not trapped beneath the fabric.
Connecting the Sling Loops
Attach the loops to the designated hooks on the spreader bar. The left and right sides normally need matching attachment positions so the person remains balanced.
Do not choose loops based only on color. Color systems are not standardized across all manufacturers. Confirm each connection visually and make sure the loop sits fully within the hook or retaining device.
Raise the boom only until the straps begin to take up tension. Pause and check the entire sling before lifting the person away from the surface.
How to Use a Full-Body Patient Lift Step by Step
The following sequence covers a typical floor-based electric or hydraulic sling lift. Controls, caster instructions, and emergency systems vary, so the operating manual for the specific model remains the final authority.

Step 1: Position the Lift and Adjust the Base
Roll the lift toward the bed, wheelchair, or chair using its designated push handles. Open or adjust the base as needed to approach the transfer surface.
Position the spreader bar above the person without allowing it to strike their head or upper body. Make sure the lift is stable and that its legs are not resting on cords, uneven flooring, or loose rugs.
Step 2: Attach the Sling and Remove Slack
Connect every required sling loop to its correct attachment point. Check that the left and right sides are even and that no loop is twisted.
Operate the control slowly until the straps become taut. Before the person leaves the bed or chair, confirm that the sling supports the head, torso, hips, and legs as intended.
Step 3: Perform a Low Trial Lift
Raise the person only an inch or two from the supporting surface. Stop and inspect the sling, loops, posture, and the person’s comfort.
If the sling shifts, a strap begins to slip, or the person reports pain, lower them immediately. Never try to reconnect or reposition a load-bearing loop while the person remains suspended.
Step 4: Raise Only as High as Necessary
Continue lifting until the person is just high enough to clear the bed, chair, or armrest. Keeping the load low reduces swinging and makes it easier to monitor the person’s position.
Watch the arms, legs, skin, clothing, and medical tubing throughout the lift. Move slowly and stop if the person’s posture changes unexpectedly.
Step 5: Move Toward the Destination
Use the lift’s push handles to guide it. Do not pull or push on the boom, spreader bar, sling, or the person’s body. Take wide, controlled turns and avoid sudden acceleration.
For caregivers who need a full-body electric model, the VOCIC AY02 Upgrade Foldable Electric Patient Lift has a 440-pound capacity and a base that adjusts from 24 to 34 inches. The adjustable width can help the lift approach different beds and seating surfaces, while its manual emergency-lowering feature provides a backup if powered lowering becomes unavailable. The lift and sling limits must still be verified for every user and transfer.
Step 6: Lower the Person Completely
Center the person over the destination surface before lowering. Descend slowly and adjust their position only in ways permitted by the sling instructions and care plan.
Continue lowering until the bed, chair, or commode fully supports the person’s weight and the sling straps are loose. Only then should you detach the loops.
Make sure the person is stable and comfortable before moving the lift away. Replace wheelchair footrests, positioning supports, or safety belts when prescribed.
The same core sequence applies in many settings, but different destinations create additional positioning and equipment requirements.
Handle Common Transfer Situations and Problems
A routine bed-to-wheelchair transfer is not identical to a toilet or floor transfer. Before changing the transfer method, verify that the lift and sling are approved for the new use.
Bed-to-Wheelchair and Wheelchair-to-Bed Transfers
Prepare both surfaces before raising the person. Move wheelchair footrests out of the way and position the chair so the lift can approach without sharp turns.
As the person is lowered into the wheelchair, align the hips toward the back of the seat rather than the front edge. Confirm that the person is fully supported before removing the sling. Caregivers who perform this task regularly should understand the complete process for a safe bed-to-wheelchair transfer, including preparation of the room and destination chair.
For the return transfer, adjust the bed height when possible and ensure that bed rails or bedding will not interfere with the lift.
Toilet and Commode Transfers
Use only a sling designed for toileting if the person’s care plan permits it. A hygiene sling provides more access, but the open design may offer less body support than a full-body sling.
Do not convert an ordinary sling into a toileting sling or leave straps disconnected for easier access. Protect the person’s privacy while continuing to monitor posture, skin, clothing, and medical tubing.
Floor Transfers
Before moving someone who has fallen, check for pain, bleeding, confusion, unusual limb position, or possible injury to the head, neck, spine, or hips. If an injury may have occurred, seek medical assistance instead of lifting the person immediately.
A floor transfer should only be attempted with equipment specifically designed to reach and lift from floor level. The steps for lifting someone from the floor safely begin with assessing the person—not with placing the sling.
Power Failure or Lowering Problems
Stay calm and support the person’s position without reaching into moving parts. Use the emergency-lowering system exactly as described in the product manual. If you cannot lower the person safely, call another trained caregiver or emergency assistance.
Never force the actuator, remove a load-bearing component, or attempt an improvised repair while the lift is occupied. The equipment should remain out of service until the fault has been identified and corrected.
Sling Slippage or Lift Instability
Stop immediately if the sling slips, the frame tilts, a caster behaves unexpectedly, or the person becomes distressed. Lower them to the nearest safe surface if the equipment can still be operated normally.
Common causes include an incorrect sling size, uneven loops, poor body positioning, excessive lift height, overloading, or a base that has not been positioned correctly. Never leave a person suspended or unattended, even for a short time.
Final Thoughts
Knowing how to use a patient lift safely begins with choosing equipment that matches the person’s actual abilities. A full-body sling lift is generally appropriate when the person cannot bear weight, while a sit-to-stand device requires active participation and adequate leg and trunk control.
Before every transfer, inspect the equipment, verify all weight limits, clear the route, and position the sling according to its instructions. Perform a low trial lift, keep the person at the minimum safe height, move slowly, and lower them completely before releasing any loops.
Families comparing additional transfer and home mobility options can exploreVOCIC, but no product should be used until the caregiver has reviewed its manual and received training appropriate to the person’s care needs.
FAQ
Can One Person Operate a Patient Lift?
Sometimes, but it depends on the lift’s instructions, the person’s condition, the care plan, and workplace or local requirements. A second trained caregiver may be necessary when the person cannot maintain posture, has complex medical equipment, becomes distressed, or requires additional positioning assistance.
Should the Wheels Be Locked When Using a Patient Lift?
There is no single rule that applies to every patient lift or every stage of a transfer. Locking requirements can differ during sling attachment, raising, movement, and lowering. Follow the manufacturer’s instructions and the method demonstrated during training for the exact model.
Can You Leave a Sling Under a Patient After the Transfer?
Only if the sling is designed to remain in place and the person’s care plan allows it. A sling left beneath someone may cause heat, wrinkles, pressure, moisture retention, or skin irritation. Check the manufacturer’s instructions and assess skin risk before leaving it in position.
How Do You Know Which Sling Loops to Use?
Use the attachment diagram supplied with the sling and lift. Loop selection affects the person’s angle and support, so the same loops may not suit every transfer. Keep the two sides symmetrical unless the manufacturer or a qualified professional specifies another configuration.
How Often Should a Patient Lift and Sling Be Inspected?
Perform a basic visual and functional inspection before every transfer. More detailed inspection and maintenance should follow the manufacturer’s schedule and any applicable facility requirements. Stop using the lift or sling immediately if you find fraying, damaged seams, bent hardware, leaks, unusual movement, or control problems.
Share:
How to Transfer from a Wheelchair to a Car Seat Safely
Elderly Getting In and Out of a Car: A Safe Step-by-Step Guide